These
tutorials assume you are already familiar with SDK (MOHRadient)
or similar and know how to create a basic room with
a light (Basic room tutorial & Basic lights tutorial).
But if not don’t worry, this should help build
your knowledge. It’s also assumed that you have
read the documentation that was released with the Editor.
This is also a basic tutorial, so if you are familiar
with GTK etc.. SORRY! This is the first time for most
new Mappers..
For this tutorial I have created a room (hollow box)
with the dimensions of (approx: 512 x 512 x 512), it’s
up to you!
-------------------------------------------------------------------------------
The Room and Pool
-------------------------------------------------------------------------------
OK, we are going to be using a common texture CALK.
What is CALK? In basic terms CALK tells the compiler
that it can ignore this when drawing the world. This
is often a face (on a brush) never seen by the Player.
This should be sufficient for this tutorial. I will
try to explain in more detail in a later tutorial.
There are a couple of calk textures in MOHRadiant,
the one we are going to us is this one (see above).
The others serve what ever purpose and you can play
with these too your hearts content.
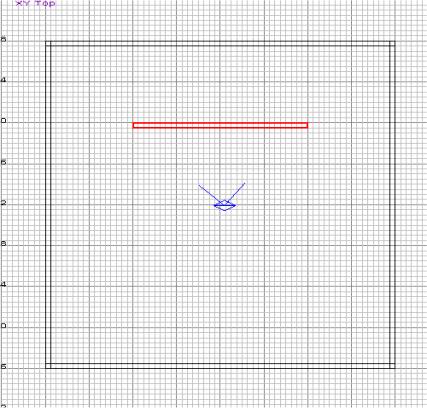
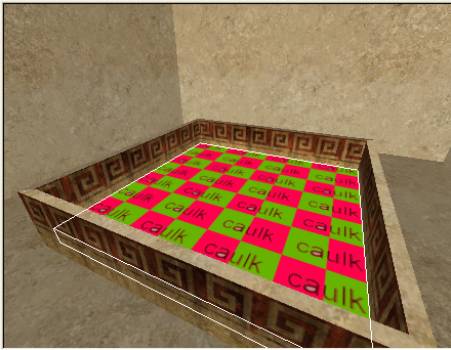
Ok, you should have now got your basic room. Create
a wall about 64 high and about 256 in length. (See below)
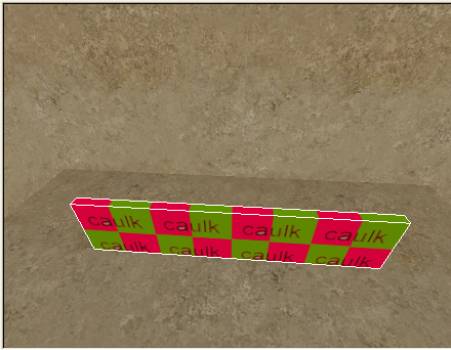
How it looks in 3D window.
Don’t worry about the caulk texture for the moment
I tend to make my entire brush with caulk until I’m
ready to apply textures. I find this good practise as
you then only apply textures to the visible world, not
having to worry about whether you applied caulk later.
In GTK you can clip and automatically apply caulk for
the generated face (very useful), but alas this isn’t
a GTK tutorial.
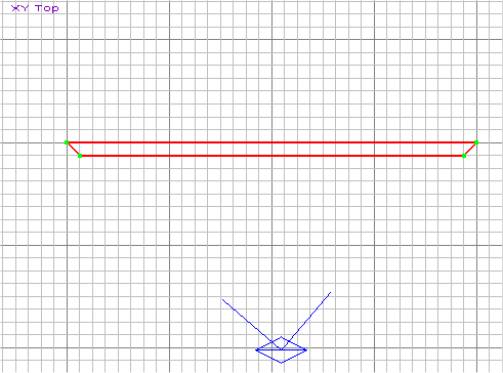
Clipping the brush. This isn’t a tutorial on clipping
or vertex manipulation tutorial, I’m going to use
a bit of it and serves as good practice. This is explained
in a tutorial in its own right.
With the brush selected press ‘V’ for Vertex
editing (ensure your 2D view is XY Top view), now in
the 2D view LEFT CLICK on the points and snap them (drag)
into play making the angle 45 degrees (see below).
OK, press ‘V’ to turn off Vertex editing.
We are now going to add some textures (but wait!), I’m
using the Algiers textures. It doesn’t really matter
for this tutorial, use what you want. Don’t get
to fancy as where not really bothered with cosmetics
just yet. But, we are only going to apply textures to
3 Faces. These are: Inside the pool, the outside and
the top. Remember we will not see the 45 degree angles
and the bottom so the caulk comes into player here.
OK, lets copy the brush. You can use CTRL + C but as
we are going to be going to be good mappers we are going
to use SPACE (Duplicate Brush). So press SPACE to make
a copy of the brush (ensuring you have the brush hightlighted
– if you don’t know how to select a brush,
whilst in the 3D window hold SHIFT + Left click the
desired brush).
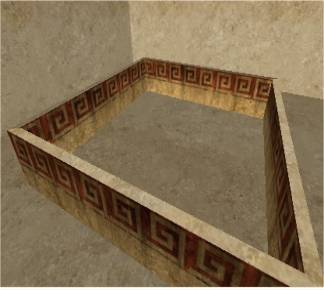
Now we are going to rotate the brush on its Z Axis
by using the following buttons :
We are going to use the one on the right. Click the
button to rotate the brush once. Now position the brush
linking the 45 degree angles. Use SPACE and Rotate until
you have created the entire pool. (see below). Use CTRL
+ TAB to view the pool in 2D view to ensure all brushes
are at equal height. Then make sure you finish back
at XY Top view. (See final Pool below)
2D View (XY Top)
3D View
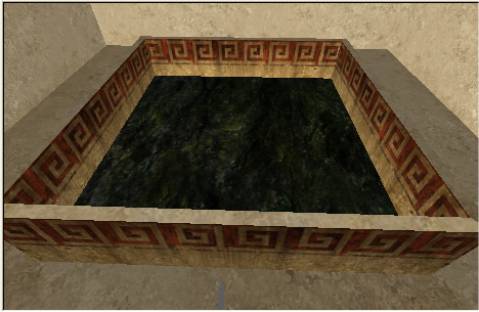
OK, we have the pool. Let’s put a floor in it!!
So create a brush (applying CAULK to it as we are only
going to be seeing the TOP Face) the brush should fit
FLUSH inside the pool and be no more than 32 high (See
below).
Press ESC to deselect the brush. Now Select the only
visible Face using (CTRL + SHIFT + Left Click). Apply
a texture, I’ve chosen Misc_outdoors/riverbed.
Don’t worry about alignment and size. Your final
pool (Pre-water!) should now look something like the
following.
-------------------------------------------------------------------------------
The Water
-------------------------------------------------------------------------------
OK, I find this a little bit strange in MOHRadiant
(being used to GTK – So spoilt!) Some of the water
Shaders, don’t show as Transparent in the Game,
but they do in the Editor. If you have the answer I’ll
be well happy!!
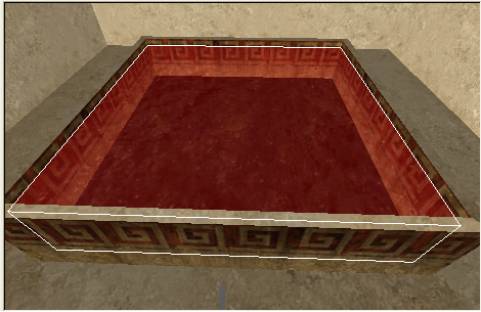
Anyway, I found a transparent shader. I used Misc_outdoors/River
for this. Right create the brush for the water so it
fills the Pool, but that it doesn’t come to the
rim of the pool or at least so it doesn’t over
flow (see below).
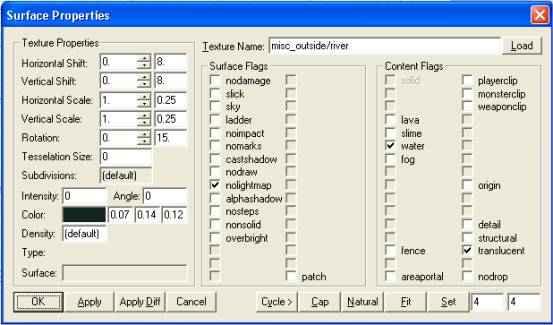
Apply the River texture as mentioned above. Now press
‘S’ to bring up the Surface Properties. (See
below)
Notice how some surface flags have been set for you?
Well the shader file has three flags set see below -
highlighted in BLUE in
the script for this shader.
textures/misc_outside/river
{
qer_editorimage textures/misc_outside/ocean2.tga
qer_keyword
natural
qer_keyword
liquid
qer_keyword
ocean
qer_trans
.4
surfaceparm
trans
surfaceparm
water
surfaceparm
nolightmap
cull
none
//deformvertexes
wave 30 sin 0 60 0 .1
deformvertexes
wave 30 sin 0 5 0 .2
{
map
textures/misc_outside/ocean1a.tga
blendFunc
GL_ONE_MINUS_SRC_ALPHA GL_SRC_ALPHA
alphaGen
lightingSpecular
tcMod
scroll .0 0.15
//
tcMod scale 2.50 2.50
}
{
map
textures/misc_outside/ocean2a.tga
blendFunc
add
//
tcMod scale .333 .33
tcMod
scroll .0 .10
//
tcMod turb 0 .2 0 .1
tcMod
scale 4 1
//
tcMod turb .1 .3 .2 .1
tcMod
scale .25 1
nextbundle
map
textures/misc_outside/ocean2a.tga
tcMod
scale .55 .55
tcMod
scroll .0 .08
//
tcMod scroll -.03 -.05
}
{
map
$lightmap
rgbGen
Identity
blendFunc
GL_DST_COLOR GL_ZERO
depthFunc
equal
}
}
Don’t get too worried about this. It doesn’t
matter too much at the moment, it just serves to show
why these have been set for you.
Right all that you need to do now is add a light and
a Player_start. Go compile and run it.
Note: Some water will not allow you to Crouch!! Coool
eh? Oh, yes when you run the map from your tutorial,
the water will not show as transparent straight away..