This Tutorial will teach you how to make roads out of "Simple
patch mesh" segments. This is a step by step tutorial, so just
follow the steps as I lay them out from start to finish.
Set the grid to an absolute minimum of 8 before starting this tutorial,
I'd say use 16. Do this now. NOW! Believe me, you will thank me
later... ( actually this is true for all mapping except a few cases,
and if you need to read tutorials: those few cases are not for you
) I repeat: GRID, NOW.
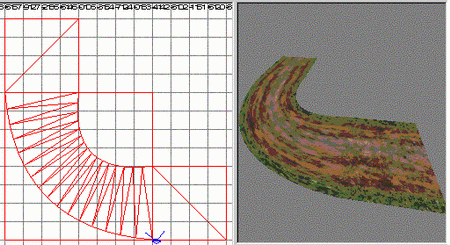
The 90° turn
This kind of turn should not be done with patch meshes as
the bend will look really ugly. A patch mesh bent this hard
will "collapse on it self" at the corner and look
like folded paper... that's bad. And besides, only street corners
bend that hard, and you can make them easily with regular brushes.
This kind of turn should be done with patch meshes as the
texture in the bend will look less bent/compressed and therefore
more natural. So lets do that.
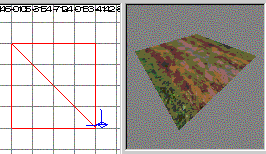
Step 1, creating a patch mesh
A good road width is 256 units ( the road where the allied spawn
in "The Hunt" is about this wide ), so draw a brush that
is 256*256 units. Make sure it is selected and then select Curve->Simple
patch mesh... Accept the default lowest values ( 3*3 ). By now the
6 sided brush should have turned into a single face. Coooool.
Step 2, texturing the patch mesh
Select Textures->misc_outside to load some road textures to
play with. Select your patch mesh and then select the misc_outside/bocroad_fullns
texture. The patch mesh should now be textured, but probably not
the way you want it. A patch mesh does not handle textures the same
way regular brushes do... basically, your only tools for aligning
the texture is the 5 buttons at the bottom of the Surface properties
dialog window ( press 'S' with the patch mesh selected to bring
it up ) labeled "Cycle>", "Cap", "Natural",
"Fit" and "Set". We wont use the first 3 ( because
I have no idea what the first 2 does and "Natural" gives
the texture a scale of exactly 1... I think...). Press the "Fit"
button to make the texture fit the patch mesh exactly.
The texture can not be rotated as we are used to on regular brushes,
so to align the road texture as you want it in your map, you will
have to rotate the patch mesh instead. This is why it is important
to texture the patch mesh before laying out the road... its really
annoying to build a long road an finally realize all the texture
end up the wrong way.
This is what you should have by now:
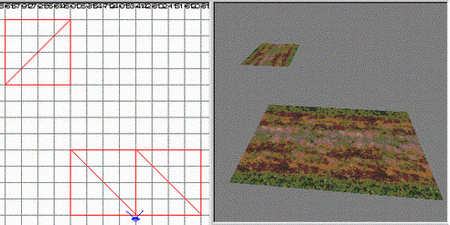
Step 3, laying the road
Copy the patch mesh you made in the previous steps 2 times by selecting
it and pressing the 'space' key 2 times. Now place them like this:
Oh, yes... rotate the "top" one 90° clockwise as
the picture shows ( press 'R' to free-rotate it ). None of this
should be a problem if you activated the grid as I told you at the
start of this tutorial.
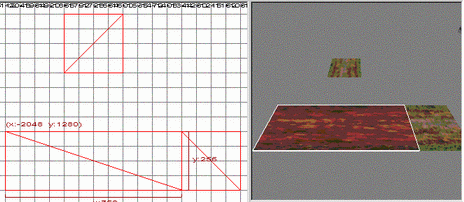
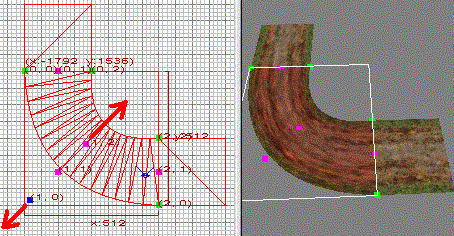
Step 4, bending the road
Now stretch out the "middle" patch mesh to triple its
length ( to 768 units ) to get this:
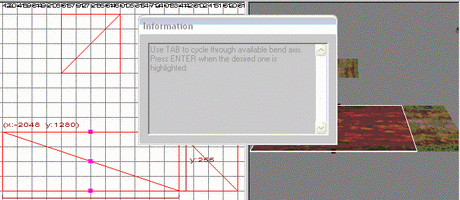
Now enter "Bend mode" by pressing 'Ctrl' + 'B'. You will
get a dialog window telling you to press 'Tab' to circle to the
desired bend axis, and to press 'Enter' when you found it. Do that
and press 'Enter' when the purple dots are aligned like this:
After pressing 'Enter' the dots will turn blue, and you are ready
to bend away! Hold down your mouse button on the grid and drag it
to bend the road 90 upwards to the empty piece of road. Press 'Esc'
to stop the bend mode. Align the upper piece so it aligns perfectly
with the bend ( easy if you have had the grid activated all along
) and you should have this:
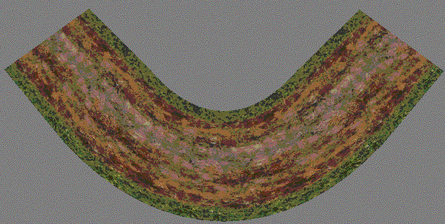
How cool is that?
Step 5, adjustments
At first glance it looks brilliant. The first time I managed this,
I was so proud I cold burst. But it can get better!
5a, fattening the bend
The bend is thinner than the rest of the road... the opposite is
mostly true for real roads. So lets fix this. Select the bend and
press 'V' ( vertex editing mode ) drag the points with red arrows
from them in the direction indicated by the arrows. Don't drag to
far, as you see the patch mesh will split up into more faces the
farther you drag them, and we want as few faces as we can get away
with to keep FPS up.
Now it should look a bit better. One thing remains to make it complete
however...
5b, fixing the stretched texture
If you zoom in a bit on the texture of the patch mesh that makes
up the curve, you will see that it is to stretched out to look really
good... lets fix that. Select the curve and bring up the Surface
properties dialog window ( press 'S' to bring it up ). At the bottom
of the dialog window, there is a button labeled "Set",
and 2 text boxes... using these we can "stack" more than
one texture on the patch mesh. The patch mesh was stretched to 3
times its original length, but the bending made the inner curve
shrink back to almost its original size, so lets put in 2 textures
in a row... that's a good "in-between value". So write
2 in the first text box, and 1 in the second and press
the "Set" button.
Just one more thing. If you used the grid ( I TOLD YOU TO! ) the
three patch meshes should be perfectly aligned. But look closely
at the seam... if you can see a line where the patch meshes meet,
the end piece is probably the wrong way: if so, rotate it 180°
and you will not be able to see the seam any more.
So, what do we do when we know we have done a good job? Naturally,
we smile!
And remember: If you can make a 90° turn, you can do any degree
turn you want to.
A final note
The observant reader can't see the point in using patch meshes
for the square pieces of road at the two ends of the bend. Normally
I would agree, but this is the first of a planned series of tutorials
on using patch meshes to create terrain. They will need to be patch
meshes for the next stage.